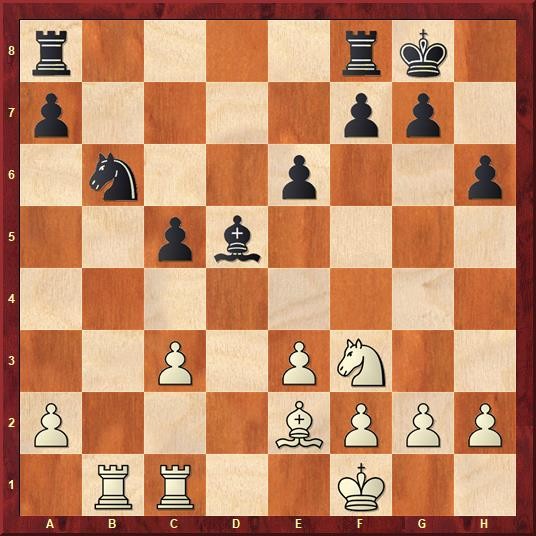
What do you think Karpov, playing White, went for in the position above?
I was initially going to save this lesson for my group chess training that I'll be launching in the next month, but I believe it's so important for chess mastery that everyone should know it!
One topic that is covered quite well in Soviet chess resources, but not so much elsewhere, is the concept of targeting the opponent's weaknesses.
It is not a big surprise, then, that our position comes from Game 27 of the classic Karpov-Kasparov 1984 World Championship Match!
It may be a surprise, however, that Karpov only needed 8 moves, from this position, to win a pawn! ('Aren't symmetrical pawn structures drawish?', I hear some of you ask.)
So, how did he do it?
I could tell you directly, but it will be even better if you figure it out for yourself!
I'm curious - what would you say are the weaknesses in this position?
To be, the main weakness that sticks out is the c5-pawn, as it is the only piece or pawn in Black's position that is currently undefended. It's also the most advanced pawn in Black's position, it the easiest for us to attack.
You may also have noticed the threat by Black to take on a2 - but is the 'threat' real?
If your answer was 'yes', you probably played a move like 19.c4 in the diagram position above, but after 19...Bxf3 20.Bxf3 Rac8, Black has a rock-solid defence on the dark squares. The f3-bishop feels like a 'ghost' on the empty long diagonal and Black will draw without difficulty.
Instead, Karpov played 19.Rb5! to attack Black's main weakness - the pawn on c5. And Black can't take on a2 after all, since 19...Bxa2 20.c4! traps and soon wins the bishop on a2. (For advanced players, it should be taken that 19.Nd2!? with the idea of f3/e4 was at least equivalent to the game).
Had Kasparov played a healthy developing move like 19...Rac8, or even gone for the 19...Bxf3 trade I mentioned before, he could be very confident in his chances to hold the position.
However, those of you who have seen Carlsen in action will know of top Grandmasters' ability to 'squeeze blood out of a stone', or get something out of nothing.
Kasparov realized his knight on b6 was not doing a lot and played 19...Nd7? to reach the diagram position below:

You see what Karpov played now, right?
If you don't see it, let me ask you again - where are the weaknesses?
That's right - c5 is defended, but the a7-pawn is also isolated.
As the old Soviet trainers liked to say, it is not enough to attack the opponent's weaknesses - we should fix them in place, to make sure they don't run away!
By that notion, 20.c4 is a good move, to fix the c5-pawn as a target, but Karpov refined the move order with 20.Ra5!, to tie the a8-rook to its passive position defending the a7-pawn. The game continued 20...Rfb8 21.c4 Bc6, and now we get to our next key position, shown below.
What do you think Karpov played here as White?
Again, let's break down the position and thought process, so that you can find these ideas more easily in your own games.
It may not be immediately obvious how White can make progress, so let's start by considering - what is Black trying to do?
Well, if Black could get in ...Rb2, his pieces would suddenly be much more active, and he could probably maintain the balance.
What about the placement of White's pieces? Are there any not pulling their weight?
Well, the a5-rook is very well placed, hitting the a7- and c5-pawns, but also defending the a2-pawn in case of the aforementioned ...Rb2. Our c1-rook and e2-bishop may not be that active, but they do defend the c4-pawn well, and it's also not that easy to improve their positions right now. The king on f1 is well placed for the queenless middlegame - close enough to the centre to be ready to fight after the exchange of pieces, but not right in the action, where it could become a target (e.g. Kc3 may run into ...Nf6-e4).
That leaves the f3-knight, which may look well-placed to an untrained eye, but in fact, it is quite dominated right now by the c5-pawn and d7-knight, which prevent Nd4 and Ne5 respectively.
Therefore, Karpov played 22.Ne1!, with the idea of Nd3 to both attack the c5-pawn and stop the idea of ...Rb2. It's one of those typical 'Karpovian' moves, in that its strength is quite obvious once it is played, but the hard part is considering such a retreat in the first place!
Kasparov probably should have tried to discourage Nd3 with 22...Be4, but instead he wanted to defend more actively, and instead played 22...Rb4, with the idea of ...Ra4 to trade off White's active rook.
What do you think Karpov played in response?
This position introduces the concept of 'prophylaxis' - which is a fancy term for considering what the opponent is trying to do, and taking appropriate steps in response. In that sense, you could say that prophylaxis permeates every serious game of chess.
However, our 'prophylactic moves' don't just stop the opponent's idea from working, but also improves our own position in some way. After all, if we just played to stop the opponent's ideas all game, we would lose the initiative (control of the game).
The pressure against a7 and c5 ensures White already has control, however, and with 23.Bd1!, White not only prevents ...Ra4, but also renews the threat of Nd3, which is now a fork to win a pawn!
Now it becomes clear that Black is struggling to avoid the loss of a pawn. He played 23...Rb7 in the game, reaching the diagram position:
You might assume that 24.Nd3 simply wins a pawn, right?
However, Kasparov's last move had set a trap! 24.Nd3 would be too impatient because of 24...Be4! 25.Nxc5 Nxc5 26.Rxc5 Rb2, when the active Black pieces grant full compensation for the pawn. If White tried to defend his a-pawn, Black would have ...Rd8 and ...Rdd2, and suddenly the 'blind pigs' on the 7th rank could devour everything in sight!
Once again, Karpov played a 'prophylactic' move in 24.f3!, stopping ...Be4 to prepare Nd3 and ensure it's a serious threat. Of course, this patient play is only possible because Black does not have a threat in this position, and with the c5-pawn fixed in place as a weakness, White can be more patient than is usually affordable.
The best defence for Black was probably to activate his king with 24...Kf8 and ...Ke7, giving up the c5-pawn but at least trying to free his pieces for the battle ahead, with decent drawing chances. Instead, Kasparov played 24...Rd8 25.Nd3 g5, when we have our final puzzle for you to 'Play Like Karpov':
If your move was to take the pawn with 26.Nxc5, then you justified Black's previous play, as then 26...Nxc5 27.Rxc5 Rb2! is strong. After 28.Rxc6 Rdd2, the Black rooks are so active on the 2nd rank that White would have to accept a draw, due to the possibility of mating threats by the two rooks swinging along the rank like Tarzan in the jungle.
Karpov instead stopped the counterplay with 26.Bb3!, first shutting out the b7-rook, as the c5-pawn won't go away. Or, as Karpov reportedly said in a press conference after the game, 'Why hurry? The fruit will ripen of its own accord'.
After 26...Kf8 27.Rxc5 Rxc5 28.Rxc5 Rd6 29.Ke2, Karpov was up a pawn for nothing - unlike the earlier lines we saw, Black doesn't have a sliver of counterplay to show for the material deficit. The fight was not over yet, but Karpov ultimately went on to win in 59 moves.
What did you love about this Grandmaster lesson?
Were there any insights in particular you latched on to?
For me, there were three key teaching points which, if mastered, would take you to the master level:
1. Attacking and fixing the opponent's pawn weaknesses in place, to ensure they can't move out of our attacks;
2. Improving the worst-placed piece, giving it a more useful function in the position (22.Ne1! and later Nd3 being the highlight).
3. Anticipating the opponent's best idea - when taking the pawn gave Black too much counterplay, Karpov instead stopped Kasparov's intended counterplay, making the threat of Nd3xc5 real until Kasparov was unable to prevent it.
It was an absolute joy to share this lesson with you and I'll admit that it was also an insightful example for me!
See you in the next GM lesson, chess students
Your Chess Trainer,
GM Max
|