
A Chess Lover? How to Make a Chessboard Patio in Your Own Garden
It’s a fun and creative idea, and it’s perfect for outdoor entertaining. It will also show all the neighbors how much you love chess, though if you are new in the world of this game, a patio is still a nice idea. Whether it’s a fun game for the kids, or an evening with friends, a chessboard patio is a great way to add definition to spaces in your yard, and even differentiate it from other areas. There are a variety of ways to achieve this fresh and interesting look; keep reading to find out how easy it is to do!
Decide What Kind of Board You Want
There are several styles of chessboard patios that you can make. You can do a simple one with square patio-pavers, you can use black and white marble tiles over an existing concrete patio, or you can do a concrete and sod chessboard out into the lawn. The first option is the easiest, the second is surprisingly elegant, and the third really defines the space, but isn’t always the best if it’s going to be your only entertaining space, as it’s not easy to use tables and chairs on it. We’re going to cover the first and second here. If you’re interested in the concrete and sod patio, there’s a good tutorial available here, as it is a bit more complex.
Decide How Big It’s Going to Be
Once you’ve decided where you want it, you need to measure the space to see what materials you need, and what size board you can make. Remember that a chess board is 8 x 8, and you may want to include a border around it. A standard 10 x 10 patio is the simplest way to go as you can use 12 inch tiles or pavers and then put a dark border all the way around. Pavers can also be as large as 16 or 18 inches, so you could make your board much larger. You’ll want to consider how such a project might affect resale value as well. You could check with a realtor in your area before you begin.
Buy Your Materials
It’s very important to purchase your materials before you begin construction of your patio as a slight variation in the size of a tile, say ½ an inch, can easily add up to 6 or 8 inches by the time you put it together. You can spend a few minutes doing a quick layout of the pavers or tiles just to be certain you like the size and the look before you begin construction.
Prepare the Area
If you’re using brick pavers, you’re going to want to lay out your perimeter, then dig out about 2 inches of the lawn inside it. Rake and level the soil underneath and compact it, then add levelling sand if needed. If you’re laying tile over an existing patio, make sure the patio is clean and dry. Also pay attention to the weather. You don’t want to get started just before it rains, as it can derail your project and you’ll wind up with a muddy mess. You can tie strings as guidelines to make sure that your chessboard is even.
Construct Your Patio
Begin and lay out one straight row of pavers or tiles, starting from the center. You want to make sure that you are alternating light and dark until you’ve laid down the entire row. If you’re placing a border around it, make sure that you finish both ends with the color you’ve selected for the border. You should have two tiles of the same color at one end if you’ve done this correctly. Once that row is finished, move on to the next, being sure to alternate your pattern as well. Some people prefer to only place light colored pavers, and instead fill in the “dark” squares with sod. This will give you a similar effect to the concrete and sod chessboard. If you’ve chosen to lay tile on top of an existing patio, don’t forget to add grout, and stay off of it until it has dried.
Enjoy Your Patio
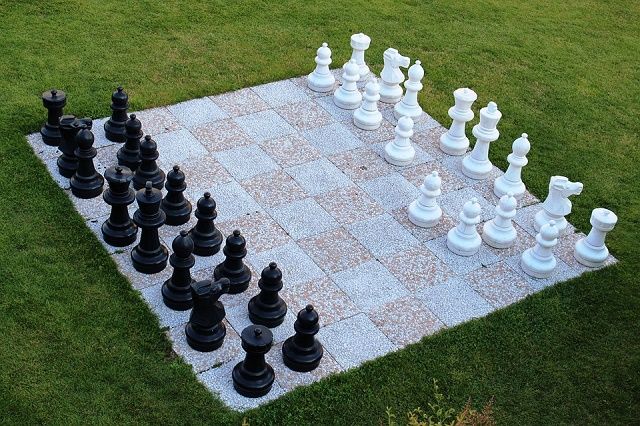
Once it’s built, you can enjoy it. You can purchase large-sized chess pieces here, or you can put together a home-made checker’s set with paper plates for the kids. If your squares are large enough, you can even run a “life-size” chess game as a child’s birthday party idea!
