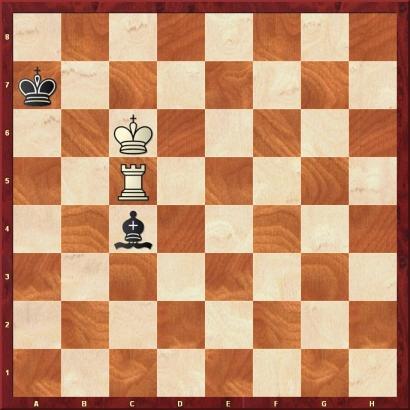
Simple yet difficult endgame Rook vs. Bishop
The endgame rook vs. bishop in the following diagram with black to move, appears to be simple.

However, soon one may discover that black has some problems to draw.
The square a8 is of the same colour as the squares that are controlled by the black bishop, which means that the side with the bishop cannot reach easily the optimal defensive setup, which is in the other corner.
We see that 1...Ba6 loses to 2.Ra5 and black is in zugzwang!
Well, black only draws by the moves 1…Be2, 1…Bf1 and 1…Bf7.
However, Black loses by 1…Bd3 or 1…Bg8.
The amazing thing is that for the human intuition the moves 1...Be2 and 1...Bd3 look the same. With only 30 sec. increment on the clock it would be really dificult to choose one.
The next diagram is similar to the first one. Black to move.

Can you recognize the position? Actually, it is the same as the one in the first diagram. The position was rotated (or mirrored) along the diagonal h1-a8.
1...Bc8 loses because of 2.Rd8.
Yes, but can you tell within 1 minute which moves draw and which lose?
