Light & Dark : A Visual Guide to Crazyhouse
Light & Dark: A Visual Guide to Crazyhouse
(visual ideas behind the moves in crazyhouse and bughouse)
mastertan 2016
In light of the increasing amount of activity of crazyhouse chess, I’ve decided to write a bit of a 'guide' to help new players of the variant and perhaps provide an alternative mindset for current players.
I’ve been playing crazyhouse & bughouse for many years on FICS (free internet chess server), and have lost many games for a very long time. I feel that it’s only really been in the previous year that I’ve been able to provide a challenge to strong opposition.
I see myself as a bit of a 'visual' player and generally try to aim for a practical game. I tend to not make many deep calculations (laziness and poor concentration), which is why I prefer to play the shorter time controls.
The aim of this article is to introduce the idea of visualizing the strengths and weaknesses on the chessboard as light/dark squares because I believe it is much more relevant in crazyhouse (and bughouse) than regular chess.
There has been lots of fantastic crazyhouse analysis and videos springing up now, but hopefully the ideas here will help you to improve your approach towards the game.
Crazyhouse chess and bughouse chess both use similar tactics so I could be referring to both of these variants when I try to explain the meaning behind moves with the use of ‘imaginary pieces’. If there is a move list next to the board in the given diagrams, you can assume the game is likely to be a crazyhouse one.
I will avoid opening theory as it can become really complicated, but will try to assess possible strengths/weaknesses of certain positions, and provide reasoning behind certain moves. When I mention ‘coloured squares’, I’m referring to either the light or dark squares. Diagonals refer to pawns and bishop, and the ‘@’ symbol notation means to drop a piece on the given square. N@f6 means to drop a knight on the f6 square.
I understand this is a really long post, so here is a quick summary of what I cover.
- Pawn structures and identifying weaknesses
- How moving the a/h pawn creates weaknesses
- Attacking the squares without bishops
- Advantages of capturing bishops
- Attacking knights and rooks with diagonals and when to push the h-pawn
- Attacking the same coloured squares as the king
- Playing against your opponent's strong coloured squares
- Consolidation
- Brief walkthrough of three games/positions ('Nf6 sacrifice/Crosky Gambit', 'attacking the light squares' and 'capturing the h-pawn to create weaknesses').
Pawn structures are a good indicator of the strengths/weaknesses of a position.
Just by observing the colour of the squares that both the black and white pieces occupy, we can very quickly assess the weaknesses and strengths of a position.
I will start off by introducing this visualization with some basic positions.
Let’s look at the Advanced French Defence.

From this position we can already picture that white is strong on the dark squares, and black is strong on the light squares by looking at the pawn structure.
In the long run, white could be thinking of ways to target f6, g7, h6, c7, d6 or e7.

White could be thinking about getting a bishop on the h4 or g3 diagonal, dropping a knight on h5 to target f6 and g7, or pawn drops on d6, f6 or h6 at some point.
Black is the opposite here. In the long run, black could be thinking of ways to target f3, h3, g2, c2, d3 and e4.

Black could be thinking of getting a bishop on the g6 diagonal, dropping a knight on h4, dropping a diagonal piece on e4, or even pushing the h-pawn to h3 to weaken g2.
Here is a different position – a standard d4-d5 symmetrical line.

If we look at this using light/dark squares again, observing the diagonals, we can see clearly that white is stronger on the dark squares, and black is stronger on the light squares.
White often continues here trying to put as much pressure as possible on the dark squares. Here is a possible continuation.
There are ideas like doubling up the bishops to put pressure on c7 and d6, pawn drops like p@e5 or p@g5, followed by p@f6 or p@h6 at some point to put pressure on g7.
Here is an example of the classic Bxf7 sack.

White is clearly strong on the light squares, which is strengthened by the e4 pawn. In bughouse, if white gets a lot of trades, it can become a devastating position for black. The queen has access to the h5 diagonal, and the knight can make its way to g5 putting pressure on f7, h7 and e6.
Next, we look at how moving the a/h-pawn weakens particular squares.
Moving the a/h-pawn creates significant light/dark square weaknesses.
Let’s look at the effect of the move h6 for black.

h6 is a seemingly innocent move, preventing white’s bishop and knight from going to g5. However, what this does is weaken g6, and in essence, the light squares around it.
See the visualization below.

This is encouraging white to play on the light squares. There are moves like Qh5, p@g6, B@b3, p@f5.
It’s the very type of position where it is very tempting for white to sack on f7.
Next take this classic e4-e5 line where the king is castled.

g6 is weakened (and the light squares around it). One idea that has been around in crazyhouse has been to capture the pawn on h6 then drop on g6 to put pressure on f7 (and h7).

Although black is safe with accurate play, it is pretty clear here how white is trying to use the light square advantage.
Given the right circumstances, this g6 weakness can definitely be taken advantaged of and become very overwhelming.
Take this position for example.

Note the absence of black’s knight on f6. This enables white to get counter play here.
White’s light squared bishop has the d5 diagonal pointing straight at the king. Because of the absence of the h7 pawn protecting g6, white can easily attack f7 here.
p@g6 is a solid choice with a possible gxf7 or Q@h7 later on.
If you have a rook or queen and a knight in hand you could play N@g6 and threaten mate on h8.
If you have the whole house in your hand you could probably play the very forcing Bxf7, followed by a series of checks (and hopefully mate).
So as the move h6 weakens g6 and the light squares around it for black, the move h3 weakens g3 and the dark squares around it for white.
Moving the a-pawn can also create certain weaknesses. Take this Sicilian position here.

We saw that h6 created light square weaknesses. The move a6 in symmetrical fashion weakens b6, and the dark squares around it.
A few moves later in this particular game, white manages to take advantage of this.

c7 is the target here, and because of no pawn on a7, b6 is weak allowing white to drop a pawn on that square helping to threaten Nxc7.
Note: In the above position, if black takes the pawn on b6, white can capture the knight on c6 followed by N@c7.
Don’t get me wrong. Moving the a/h-pawns is not necessarily ‘bad’, but I think it is important to realize the consequences of it and make the appropriate calculations – there are most certainly incorrect times to play these moves. A lot of low rated players do tend to fall into the trap of creating these weaknesses when they perhaps may not realize it.
Next, attacking the coloured squares with no bishops.
Attack the squares with no bishop.
At the start of this guide we saw how pawn structures can indicate strength of certain coloured squares. Observing the whether there are bishops on the board is another good indicator of light/dark square weaknesses.
Bishops are extremely useful because they can cover a lot of good squares, and are meant for putting ‘big’ pressure over a long diagonal.
Take this classic position here to examine the usefulness of the bishop.

White has just dropped a knight on h5 threatening to take on g7. Black can’t protect it with Rg8 because of Bxh7. N@f5 is not possible either because it will get taken by the bishop.
Examine this next position and note the absence of black’s dark squared bishop.

The absence of the black’s dark squared bishop here suggests that white is stronger on the dark squares. Also note that the bishop leaving the f8 square results in the g7 square left weak.
If this were a bughouse game, natural moves could be p@f6, p@h6, p@d6, N@h5 and B@h4.
In crazyhouse, white can try to pressure the dark squares with B@h4, then try and find a way to capture a knight to drop on h5 and pressure g7.
Have a look at this next position. White has a bishop and a pawn to drop.

Once again black has no dark squared bishop, so it can indicate that black is weaker on the dark squares. We can look at ways to target f6, e7, c7, and d6.
White could consider B@h4, targeting the f6, and e7. This move also threatens to capture the knight and play N@d5, attacking the queen and the c7 square.
p@e5 is also a nice try. Chase away the knight on f6 then continue with Nd5 attacking c7 and the queen on e7.
This bishop absence idea brings me to the next idea.
Create light/dark square weaknesses by capturing bishops.
Sometimes your opponent might willingly exchange a bishop for a knight, but you can also force this exchange for your own advantage over certain coloured squares.
Take this classic e4-e5 Be7 line (white to play here).

White can capture the bishop on e7 here, and continue by adding pressure to the dark squares such as e7, f6, g7 and h6.

This is the position after Nxe7, Qxe7, and white has just played B@h4.
We can see all the possible dark square weaknesses in black’s position here.
Knight drops like N@d5, N@f5 and N@h5 add pressure to these squares.
If black plays Bxf3, Qxf3 adds pressure to the knight on f6. White can attempt to encourage this by playing h3.
If black plays Nd4, white can play Nxd4, followed by Nf5 to add pressure on e7 and g7.
Here is an example position from a game, which ended with a win for white.

We can see the strength of the knight on f5 here and the pressure to the dark squares from the bishops on h4 and e7.
Here is a similar example with the black pieces this time.

N@f4 is played (N@d4 is also possible) to try and capture the bishop on e2 to create light square weaknesses.
We can consider moves like B@h5, p@h3 (remove g2 pawn and weaken f3) and p@g4 (kick away the knight then play Nd4 putting more pressure on the light squares).

So this is one way of capturing the bishop to create weaknesses.
Here is a classic technique to ease pressure on coloured squares with a simple knight manoeuvre.

White has just played Na4, attempting to capture the bishop to reduce pressure on the c5 diagonal (f2 square in particular).
This is quite a common idea that we see quite a lot in e4-e5 positions.
This idea is also possible in certain d4-d5 situations.

The idea here is to reduce pressure on the light squares (like c2 and g2), and prepare to drop a bishop on g3 to aim for c7 (dark squares).
Sometimes it is possible to avoid this tradeoff by pushing either the a/h pawn.

White has played a4, preparing to retreat the bishop to a2 to avoid capture by the knight.
There are other situations where capturing the bishop is useful. Take the following position below.

The idea here is to capture the bishop then go for the dark squares (e.g. B@h4).
Now a different example, in which you can encourage your opponent to capture your knight with a bishop.

Black has just dropped a knight on f4. This is a useful move for many reasons. It attacks the light squares (e2, g2 and h3), and it also blocks the bishop on c1 from pressuring the dark squares. Because of the pressure the knight is putting on the light squares, it is quite natural to capture it straight away.
Let’s examine a possible continuation from here following from
Bxf4 exf4

Note the dark square strengths for black (e3, g3, f2, h2).
N@f5 Bxf5
exf5 Bxf2!
And now black definitely has a lot of dark squares to play for.

This is a pretty uncomfortable position for white as p@g3, p@e3, B@b6 and N@g4 all have to be dealt with. Even Qh4 later on could be a useful resource to drive the knight away from protecting h2.
Let’s go back to a similar position to earlier where white’s bishop is on d3.

Capturing the bishop on d3 in this type of position is a common idea as well (particularly in bughouse). The idea is to relieve the pressure of the bishop aiming at h7. Moves that follow this could be B@h5 or B@g6 (going for light squares).

There are also ways to force your opponent to move their bishop into a passive position without necessarily capturing it. Take the following example.

This is a classic example of making use of the pin on the knight.
White has just played the move p@a6.
Black can’t capture a6 because of Bxc6 winning a piece.
If black ignores the pawn then white will win a piece.
e.g.
axb7 Bxb7
p@a6 …
and if Bc8, Bxc6 wins a piece for a pawn for white.

There is a way around this for black though with a simple piece manoeuvre.
After p@a6 ...
… Rb8
axb7 Bxb7
p@a6 Ba8

And the knight on c6 is protected. The difference is that the bishop is now on a8, and its long diagonal is blocked by the d5 pawn.
The c8 diagonal is now freed up for white (less light square pressure).
A move like N@f5 can now be played to target g7, and the light squares around f7 could become a target (such as e6). This is a useful resource in bughouse.
Attack knights and rooks with diagonal pieces.
This is an obvious statement I know, but I feel it is important to say this to continue this theme of light/dark colours.
Knights and rooks are a great indication of where to attack with diagonals.
It's quite common for a knight to be pinned by a bishop, and a pawn drop will threaten to capture it.
There are many situations when a knight is attacked by just a single pawn. But is this all that is really happening? We can draw in the imagery.
Here is an example of when it is good to push the h-pawn.

Usually when the knight is on either g6 or g3, I want to push the h-pawn to attack it. But there are other reasons for playing this way.
The knight is on a light square. In the long run, getting the pawn to h5 can create opportunities later on to attack f7 and h7 (light squares). White also gets the opportunity to open up the h-file for the rook.
We can draw the lines on the light squares to show this.

Here is another example, this time from the black perspective.

This is an e4-d5 Nc3 line where black has pushed the pawn to d4.
The same idea applies. We aim to attack the knight, but really what we can aim for are the dark squares such as h2 and f2.
So what can white try to do to stop the h-pawn from advancing in this particular position? Well, a common idea is pushing the h-pawn to block it.
This is not necessarily a bad idea in general but it does not work in this particular situation. If we remember one of the earlier points I made.
Moving the a/h-pawn creates significant light/dark square weaknesses.
The dark squares are weak for white here. In this situation, black can play Bd6, threatening to take the knight on g3 creating an f2 and e3 weakness. Black can also follow up with Ng4.

So this is just an idea of using knights as a reason to go after a particular coloured squares.
This also applies to rooks as well.
This is a classic example of attacking a castled king.

The rook and the knight here sit on the dark squares, which is also the coloured square that white is strong at.
We move onto to this next idea, which gives us another indication of what coloured square to attack.
Attack the same coloured squares as the king.
This is another strange statement I know. This is useful like for when you are searching for a mate... but another is because of tempo. Applying checks to the king or by making the king move into the open can result in getting more pieces on the board than your opponent.
Here is a very basic example.

Black’s king is on f8 (dark square). This position here is basically screaming ‘attack the dark squares’.
In bughouse p@h6 is a strong choice. Maybe a move like p@f6 is also a decent choice.
In crazyhouse, a strong continuation here would be Nxg7. This encourages the king into the open.
A couple moves ahead and white has a pretty relaxed position.

Here’s another position.

This is one possible continuation of the Sicilian Defence in crazyhouse. The king is on e8, a light square, and white is putting pressure on the light squares with the Bishop, knight and pawn.
Here’s another example.

White has lots of opportunities to attack the light squares here. There are threats like Nxf7, Nxh7. There is also a possible eventual Ng5 check to capture the Bishop on g4.
Black cannot ignore the threats so easily because the king is on a light square.
We should have a pretty basic understanding now where the strengths are in a position. But how to defend against certain coloured squares? This brings me to the next idea.
Find your opponent’s strong coloured squares and look for ways to oppose it.
Sometimes it is very clear that your opponent is playing with dark/light coloured squares in mind. One of the natural ways to play against this is to ‘oppose’ it back directly or ‘neutralize it’.
Take this Fianchetto opening for example.

Black has fianchettoed the bishop on the Queenside, and is making a play on the light squares. The bishop diagonal is pretty clear; the knight is putting pressure on e4, and the pawn on e6 is controlling the light squares on d5 and f5.
White can easily 'oppose' this with the move f3.

This is a common system favoured by many high rated players. We can see clearly the line of pawns opposing the light squared bishop.
This can also work the other way round.

Sometimes players do not neutralize the position like this, and just have to be more careful dealing with the weaknesses.

In this case, the g7 square (dark squares) can be left unprotected if not careful.
We now look at individual moves that work against your opponent’s strong coloured squares.
The next example is of a d4-d5 opening.

This is a system against d4 that JannLee uses frequently. The move f6 in this case works to counteract white’s dominant dark squares.
Here’s a different example.

White has just played Bg5 - an attempt to put pressure on the dark squares. The move that white would like to play is e5 to attack the pinned knight.
It is quite natural for black to play Be7, but this may not be so good.
This is an example continuation.
… Be7
e5 Nd5
Bxe7 Qxe7
Nxd5 exd5
N@f5 …
This position has occurred quite a lot in bughouse, and black has things to worry about.

Instead of Be7, quite simply d6 can be played. This counters the dark squares (the move e5) that white is putting pressure on.

As well as finding your opponent’s strong coloured squares, it works the same to look for your own ‘weak’ coloured squares, and improve it.
Next take this e4-e5 variation as an example. This is black to move and black has a bishop to drop.

From several of my points so far, we can clearly see that white has an advantage on the light squares.
We know this because of the move h6 (weakening g6 and f7), from the Bishop on c4, from the pawn on e4, and because of a possible Qh5 move much later on.
So what can black play to fix this?
Black can play to try and neutralize the position with B@e6.

It blocks the bishop diagonal on c4, and protects the f5 square.
I believe this sort of play is quite important throughout a game in crazyhouse – protecting the weak coloured squares. Moves like this can determine who gets the ‘edge’ in a game.
Here is another way of ‘neutralizing’ a position.
Sometimes pawns can take up a lot of space, and exert a certain amount of pressure on the board. In the right situation, it is very much worth trading a minor piece for two pawns to get some control back on the board.

In this position here, white has offered the 2 pawns for a knight. There is no clear sense here which coloured squares white is strong at.
Here is a really neat example that I found.

The game continued
… Nfxd4!
Nxd4 Nxe5

Black has successfully managed to ease white’s dark square pressure, and now has a pretty strong center.
So with all these general ideas in mind, we move on to what I think is an important point. Though it might seem obvious I think it is an important one to think about.
Consolidate your position before attacking.
Winning a zh game is not necessarily all about attacking, but also about knowing exactly when to defend.
Sometimes your opponent will sacrifice a lot of material to create weaknesses near your king, and then time must be spent to consolidate and ‘make the king safe’.
I tend to ask myself frequently ‘what can my opp do?’
If the answer is ‘not much’ then it is a good indication to start attacking.
It’s a valid tactic to make sure your own king is so safe that your opponent cannot touch it at all. You can do this by quickly identifying the weak coloured squares and defending it.
I suggested before that moving the a/h-pawn creates significant weaknesses. The truth is that this really applies to all pawn moves. Again, this is probably an obvious statement but still true and good to fully realize it, and play moves thinking about these weaknesses rather than just blindingly developing pieces.

The circles here represent the squares that the pawns that have moved are not protecting since they moved. Each of these spots could be a possible target during the game.
Eventually you might think stuff immediately like ‘Caro-Kann / French Defence – black is weak on dark squares’, ‘e4-e5 – white is strong on the light squares’ etc.…
So with all the general ‘rules’ I’ve made so far in mind, let’s look at a few more game examples and see how it is possible to put this light/dark square vision into practice.
This game that I made up takes a closer look at the Nf6 sacrifice opening, which has also been called the 'Crosky gambit' quite recently.
1. e4 Nf6
2. e5 d5
3. exf6 gxf6
4. d4 …

This is the gxf6 line. Black has sacrificed a knight for a pawn. Looking at the colours, we can see that black is quite solid. The d5 pawn is strengthening the light squares; the pawn on f6 is controlling some dark squares. White needs to do a bit of work to win the game from here. Black also has an idea to play Rg8 to pressure the g2 square.
4. … Nc6
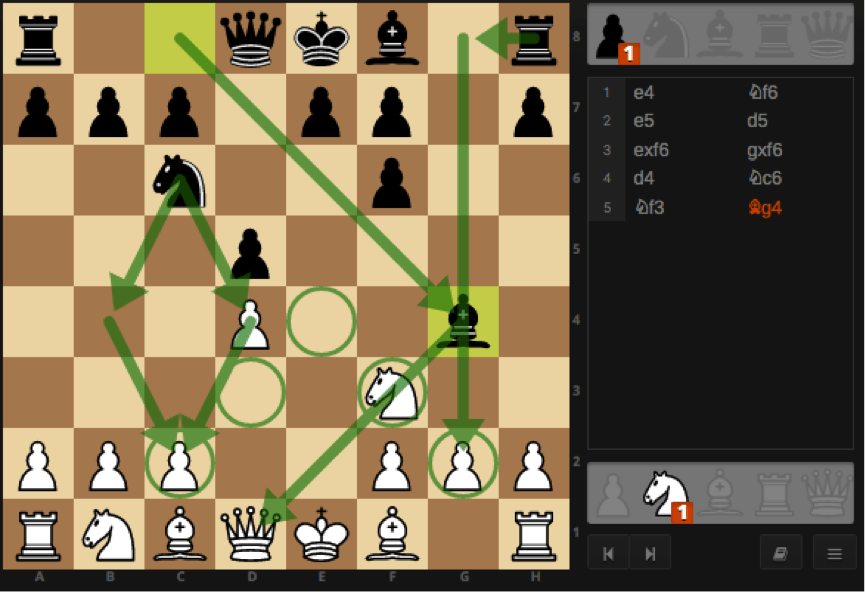
5. Nf3 Bg4
The move Nf3 here is a bit questionable because it can’t go to e5. But let’s visualize this position with the colours in mind again.

White is clearly weak on the light squares. The squares are c2, f3, g2, e2, e4 and d3.
Black’s light square bishop is pinning the knight threatening p@e4.
This position actually provides a classic opportunity for black. White’s knight and Queen protect the pawn on d4. For example, if white innocently plays h3 to try and kick the bishop away, white is met with Bxf3. White cannot recapture with the queen since it allows Nxd4 and it allows black to pressure c2 and f3.

So going back to the previous position, a move that is quite commonly played to protect the pin in this sort of position is Be2.

If we remember one of the points I made earlier.
Create light/dark square weaknesses by capturing bishops.
If we get rid of the light squared bishop here, it becomes a lot easier to pressure the light squares. From the bishop leaving the f1 square, g2 is left weak. Also note that white does not have any really useful squares to drop the bishop on the board.
- … p@e4
- Ng1 Bxe2
- Nxe2 B@g4

The threat here is Bxe2, Qxe2, Nxd4 snatching the d4 pawn similar to the idea above.
Black has ideas to target g2 with Rg8, or capture a knight and drop on h4.
Black can also try to think of ideas to sack a piece on the g2 pawn to drop a pawn on f3.
I will leave this position as it is here. This is not an easy position for white to play, and this is almost certainly crushing for black in bughouse.
But going back to the opening, how could white play against the light square weaknesses?
Take a look at this other variation.

Ne2 is played instead of Nf3. What this allows is the move f3 at some point, which counters the light square weakness. Bg4 is not so useful here.

The general idea of Ne2 is to move it to Nf4 to put pressure on the d5 pawn. Nf4 also allows Nh5 later on.
Here is another game.

This is white to move here. By now you should be screaming ‘light squares’.
8. Ng5 …
Ng5 is a move preparing to sack on f7. There is no easy way for black to defend it.
8. … Nh6
9. N@c6 …

N@c6 threatens to capture the queen. The only place it can go to avoid getting taken is d7… a light square.
9. … Qd7
10. Nxf7 Nxf7

And the queen is lost here.
The game continued on to reach the following position.

White has a cute little mate here. Can you find it?
This is the final example.
Let’s go back to one of the points I made earlier.
Moving the a/h-pawn creates significant light/dark square weaknesses
Given the right situation, it’s possible to sacrifice a piece for the a/h-pawn to force some weaknesses.
For example, a move like Bxh7 removes the h-pawn, and creates a weakness on g6 and its surrounding light squares.
The following position uses this idea in bughouse.

In bughouse, if Rxh7, white could follow up with B@g8 (threatening to capture on f7 and capture rook).
There are also ideas of p@g6 followed by p@f7 and Ng5 or N@e5.
In crazyhouse however there is no luxury of receiving such pieces out of thin air, and this tactic becomes much more situational.
I will finish up this article with an example of this in action.
This was one of the games I played earlier this year. I was playing with the black pieces.

White has just dropped a pawn on b6 forking the rook and the queen.
The position is a bit blocked up, and it is difficult for either side to find a quick win here. White’s position has very solid control over the squares near the king.
Probably the most natural move here is to back the queen away and capture the pawn on a7, but I didn’t like the idea of the queen moving to a very passive square.
… Qxh2!

The idea is to create dark square weaknesses.
The target squares are g3, f2, e3 and g5. Black has ideas of N@e4 followed by p@g3 and also B@d6+.
Several moves later, the position reached this.

If you remember the point I made earlier about the bishop squares…
Attack the squares with no bishops.
This is what black is currently doing.
The position continued with
B@e1 gxf2
Bxf2 p@e3
Be1 p@f2
p@h2 …
Now black has the option to capture the bishop or the rook.
Create light/dark square weaknesses by capturing bishops.
Capturing the rook here is not very useful, but if the bishop is captured, it leaves f2 weak (dark squares) allowing Nf2.
The game continued to finish 0-1 in strong favour for black.
So there we have it – my approach to visualizing crazyhouse. ![]()
These are my basic (and probably weird) ideas on visualization on the chessboard. The actual game requires a lot more calculation (which I never do enough of), and it is certainly not as easy as just looking at weak spots and going straight for it.
The ‘rules’ I provided are just mere guidelines, and are certainly not meant to be relied on. Hopefully I’ve provided some interesting reading, and that this can somewhat help players get started to find their game.
If you got through all of this, thanks a lot for reading, and I hope it proved useful.
