Hello variant creators! Today I will be taking you through the different tools and options in the new variants server board editor. Most of these tools are exactly the same as they were before the merge, but their locations may have changed and there are still some people out there who don't know what they do anyway. Hopefully, this makes the creating process much faster and easier.
We'll start off by first finding out where the editor is. Previously, there was a button that took you right to the analysis board, but this time you'll have to go onto the variants homepage and click on "4 Player Chess" (it doesn't really matter which one actually, you just have to click on one of the games to reach the analysis board). You can also use the hotkey "A" (enable keyboard shortcuts first) to get there quickly.
You can click on any of the games listed on the homepage to access the analysis board and editor.
You will be taken to a page that looks like this (focus on the right sidebar):
This is the page mentioned above.
Click on "Edit Position", as shown above, to access the board editor.
Once you've done that, you can see all the options to create your custom position. The first option you will see (disregarding the "Analysis" and "Play" buttons which are self-explanatory) is the "Symmetric Editing" button. If this is enabled, based on how many players there are in the game, whenever you place or remove a piece or wall in one square, it will automatically add or remove three other pieces (they are the same) or walls on squares in such a way that it creates 4-way symmetry. Many custom variants are symmetrical in every direction, such as Ocean's Mini or Arena of Legends. You can use these as references if you don't understand what I'm talking about.
The button is right below the green "Analysis" and "Play" buttons.
Below that, you have the dropdown menu for presets. Most of these are listed custom variants, but some are miscellaneous, such as "Empty 8x8" and "4P Giveaway 960".
This is the preset dropdown menu (not all presets are shown).
Right below the preset dropdown menu are these other dropdown menus and buttons.
There are two dropdown menus and two buttons.
The two dropdown menus consists of even numbers ranging from 2 to 14 (not odd because that messes with symmetry and promotion), which you can use to specify the board size. For example, this is what a board with size 4 x 12 would look like:
Note that the board itself will always be square, which is why there are transparent bricks around the board to create the effect of it only being a 4 x 12 board. If you want to remove these, click the button next to the dropdown menu, as explained below.
The first button is just a board expansion button—when pressed, it expands the board to a square with transparent bricks (as shown above) and when pressed again shrinks it back to its preset size, which in this case is 4 x 12.
This next button is the "Edit Rules" button, which is self-explanatory: press the button and you can access game rules (and yes, more presets, including some of your own templates).
This is the "Edit Rules" button, located below the presets dropdown menu.This is the menu for selecting game rules for your custom variant. Experiment with different game rules and create cool concepts revolving around these rules.This is a list of more presets (again, not all are shown here).This tab is where you can save your game rule presets as templates. I currently don't have any saved, however, as I don't find this option all that useful.
These buttons are where you select the game mode for your custom variant.
Depending on which game mode you have selected, the game rules will change (i.e., self-partner in teams, diplomacy in FFA).
Once you're done with selecting your game rules, you can click the green "Close Rules" button.
Below that is the menu where you can select pieces/bricks and place them on the board. As you might notice, there are a total of six buttons. Four of them are for the four different colors—one for each color, though this varies based on how many players you want to have in your variant—one of them is for dead pieces, and one of them is for bricks.
This is the menu for selecting pieces and bricks. Notice the two buttons, whose purposes will be explained shortly.
The button underlined in green is another expansion button, which simply shows all the pieces for all the colors in the same menu (including bricks):
This is the expanded menu (without fairy pieces).
The other button, underlined in red, shows all the fairy pieces. The expanded menu with fairy pieces looks like this:
This is the expanded menu (with fairy pieces).
For a list of all the fairy pieces, their names, and their move sets, you can read through this useful article.
Moving on, we reach one of the final and most important sections, where extra options are located. This section is where the player to move can be selected, which colors are dead (not playing, do not get a turn), and more, which can be see by clicking the grey "More Options" button.
The "More Options" button isn't shown here, however, the options that can be seen after clicking the button are shown.
If you set a certain color to be dead, you can still gain points for capturing pieces of that color, but that color cannot move. (To set dead pieces that you cannot gain points for capturing, see the piece menu above.) Here is an example:
In this image, red is dead, but red pieces are still worth points. Blue is also dead, but blue's pieces are grey, and thus are not worth any points.
The next button is the "Set Royals" button, which is self-explanatory. You press the button, then click on four pieces to set the royal pieces for each color.
This is the "Set Royals" button.This is what the menu looks like after pressing the button.
After that, there are three rows of switches. There are four switches in each row—one for each color.
The "Kingside Castling" and "Queenside Castling" switches are self-explanatory, so I will only be explaining the "Zombie" switches. Note, however, that players can only castle in both directions if the royal piece is in between two rooks.
If you set a player to be a zombie, that activates extra options. That color playing as the zombie is alive and is worth points but isn't controlled by a human, rather a computer that plays like the one specified in the dropdown menu (shown below). If a zombie is set to be immune, other players (human or computer) can't capture that zombie's pieces. Regular zombies are depicted by circles around the pieces and immune zombies have squares around their pieces.
This is the extra options menu for zombie players. Notice the dropdown menu where you can choose what kind of computer the zombie plays like, such as a Muncher, where the computer captures pieces whenever possible, or a Checker, where the computer attacks a player's royal whenever possible. The default setting is Rando, where the computer makes 100% random moves.
The next two menus are related to pawns.
The "En Passant" dropdown menus aren't all that useful, unless you want to have en passant available on the first move for each player, which (I'm pretty sure) none of the already listed custom variants have. I suggest you disregard these options, but you can still use them if necessary.
Disregarding the "En Passant" menus, we are left with the "Pawns Home Rank" dropdown menu, which is basically where you choose the starting rank of the pawns—again, self-explanatory. Whichever rank you choose as the starting rank—and the rank behind it—is where pawns can move two squares on their first move.
The home rank for the pawns in this position is the 5th rank. Therefore, pawns on both the 5th and 4th ranks can move two squares on their first move, but neither the pawns on the 3rd nor the 6th can.
And finally, we've reached the FEN4 of the position. The FEN4 of the position is like the "code" for the position. Every position has a distinct FEN4 which you can change if necessary, although I don't tend to do it. There are some "extra" options that you can have in your custom positions that you can only change with the FEN4 and PGN4, but those are complicated, so I might make another post just for them.
Those are all the options in the board editor, so once you're done creating your variant, click the green "Analysis" button all the way at the top to go back to the analysis board. Once you've done that, you can save it as a template, or save it to your device by clicking the "Download PGN4" button on the right, as shown here:
This is the "Download PGN4" button.
Make sure to name your position, as it will be much easier to find when you come back to it later! After you've saved a PGN4, you can open it by clicking the "Open" button and finding your variants. You can also edit the PGN4 directly and load the changes by clicking the "Load" button. There are also the "Clear PGN" and "Copy PGN" buttons, symbolized by the trash can and the double squares.
And that's all there is to it! Feel free to message me if you think I missed something that should be added. Anyway, thanks for reading all the way through this guide and I hope it helps you with your creating process!
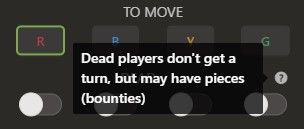
Note that if you are having trouble following along or understanding, you can always hover over the little question marks next to some of the options, like shown here:


Hello variant creators! Today I will be taking you through the different tools and options in the new variants server board editor. Most of these tools are exactly the same as they were before the merge, but their locations may have changed and there are still some people out there who don't know what they do anyway. Hopefully, this makes the creating process much faster and easier.
We'll start off by first finding out where the editor is. Previously, there was a button that took you right to the analysis board, but this time you'll have to go onto the variants homepage and click on "4 Player Chess" (it doesn't really matter which one actually, you just have to click on one of the games to reach the analysis board). You can also use the hotkey "A" (enable keyboard shortcuts first) to get there quickly.
You will be taken to a page that looks like this (focus on the right sidebar):
Click on "Edit Position", as shown above, to access the board editor.
Once you've done that, you can see all the options to create your custom position. The first option you will see (disregarding the "Analysis" and "Play" buttons which are self-explanatory) is the "Symmetric Editing" button. If this is enabled, based on how many players there are in the game, whenever you place or remove a piece or wall in one square, it will automatically add or remove three other pieces (they are the same) or walls on squares in such a way that it creates 4-way symmetry. Many custom variants are symmetrical in every direction, such as Ocean's Mini or Arena of Legends. You can use these as references if you don't understand what I'm talking about.
Below that, you have the dropdown menu for presets. Most of these are listed custom variants, but some are miscellaneous, such as "Empty 8x8" and "4P Giveaway 960".
Right below the preset dropdown menu are these other dropdown menus and buttons.
The two dropdown menus consists of even numbers ranging from 2 to 14 (not odd because that messes with symmetry and promotion), which you can use to specify the board size. For example, this is what a board with size 4 x 12 would look like:
The first button is just a board expansion button—when pressed, it expands the board to a square with transparent bricks (as shown above) and when pressed again shrinks it back to its preset size, which in this case is 4 x 12.
This next button is the "Edit Rules" button, which is self-explanatory: press the button and you can access game rules (and yes, more presets, including some of your own templates).
These buttons are where you select the game mode for your custom variant.
Once you're done with selecting your game rules, you can click the green "Close Rules" button.
Below that is the menu where you can select pieces/bricks and place them on the board. As you might notice, there are a total of six buttons. Four of them are for the four different colors—one for each color, though this varies based on how many players you want to have in your variant—one of them is for dead pieces, and one of them is for bricks.
The button underlined in green is another expansion button, which simply shows all the pieces for all the colors in the same menu (including bricks):
The other button, underlined in red, shows all the fairy pieces. The expanded menu with fairy pieces looks like this:
For a list of all the fairy pieces, their names, and their move sets, you can read through this useful article.
Moving on, we reach one of the final and most important sections, where extra options are located. This section is where the player to move can be selected, which colors are dead (not playing, do not get a turn), and more, which can be see by clicking the grey "More Options" button.
If you set a certain color to be dead, you can still gain points for capturing pieces of that color, but that color cannot move. (To set dead pieces that you cannot gain points for capturing, see the piece menu above.) Here is an example:
The next button is the "Set Royals" button, which is self-explanatory. You press the button, then click on four pieces to set the royal pieces for each color.
After that, there are three rows of switches. There are four switches in each row—one for each color.
If you set a player to be a zombie, that activates extra options. That color playing as the zombie is alive and is worth points but isn't controlled by a human, rather a computer that plays like the one specified in the dropdown menu (shown below). If a zombie is set to be immune, other players (human or computer) can't capture that zombie's pieces. Regular zombies are depicted by circles around the pieces and immune zombies have squares around their pieces.
The next two menus are related to pawns.
Disregarding the "En Passant" menus, we are left with the "Pawns Home Rank" dropdown menu, which is basically where you choose the starting rank of the pawns—again, self-explanatory. Whichever rank you choose as the starting rank—and the rank behind it—is where pawns can move two squares on their first move.
And finally, we've reached the FEN4 of the position. The FEN4 of the position is like the "code" for the position. Every position has a distinct FEN4 which you can change if necessary, although I don't tend to do it. There are some "extra" options that you can have in your custom positions that you can only change with the FEN4 and PGN4, but those are complicated, so I might make another post just for them.
Those are all the options in the board editor, so once you're done creating your variant, click the green "Analysis" button all the way at the top to go back to the analysis board. Once you've done that, you can save it as a template, or save it to your device by clicking the "Download PGN4" button on the right, as shown here:
Make sure to name your position, as it will be much easier to find when you come back to it later! After you've saved a PGN4, you can open it by clicking the "Open" button and finding your variants. You can also edit the PGN4 directly and load the changes by clicking the "Load" button. There are also the "Clear PGN" and "Copy PGN" buttons, symbolized by the trash can and the double squares.
And that's all there is to it! Feel free to message me if you think I missed something that should be added. Anyway, thanks for reading all the way through this guide and I hope it helps you with your creating process!